0x 101: Getting started with Swap API
In this guide, we'll dive into how to build with Swap API - using it to programmatically find the best token price and execute a trade.
May 16, 2023
Learn & Build

In 0x 101: Intro to Swap API, we covered the basics of Swap API and how it benefits users and Web3 developers. In this guide, we'll dive into how to build with Swap API - using it to programmatically find the best token price and execute a trade.
To recap, Swap API is a REST API that runs on HTTP. Swap API aggregates liquidity from 100+ liquidity sources, including the most popular AMMs and private market makers, across chains, allowing you to easily tap into the deepest liquidity with one simple integration.
Under the hood, Swap API:
- Queries prices from dozens of decentralized exchanges and market makers and aggregates the liquidity from the queried sources to provide the best price possible.
- Swap API’s proprietary smart order routing algorithm then splits up a user’s transaction across different sources to maximize the overall return on the trade.
- Swap API's responses are returned in a format that can be easily executed using the Web3 library of your choice. Whether you prefer web3.js, ether.js, or something else, you are in control.
The Swap API has 3 endpoints - quote, price, source. First, let’s take a look at the quote endpoint. Then we’ll see how you can swap tokens with Swap API in 3 simple steps.
GET /swap/v1/quote
This endpoint allows you to get an easy-to-consume quote for buying or selling any ERC20 token. The return format is a valid unsigned Ethereum transaction and can be submitted directly to an Ethereum node (or the nodes of other chains if applicable) to complete the swap.
Request
Here is a simple GET request to get a quote to buy DAI with 1 WETH:
We can break down the request to see the required request parameters:
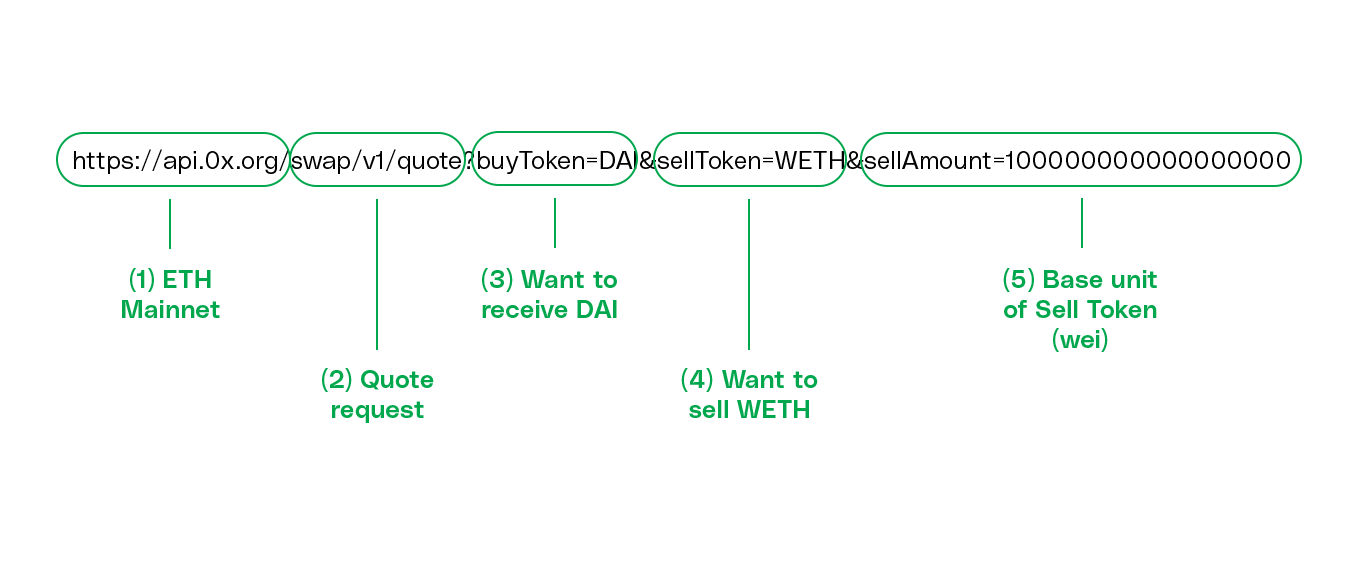
- Network: Indicates the network we want to query. This example shows ETH Mainnet. For a full list of endpoints, check out this list.
- Quote request: Indicates we want a quote to buy or sell an ERC 20 token.
- buyToken: Indicates the ERC20 token address or symbol of the token we want to receive, in this case DAI.
- sellToken: The ERC20 token address or symbol of the token we want to send, in this case WETH.
- sellAmount: The amount of sellToken (in the units of the sellToken) that we want to send.
This is actually a live, queryable request. Go ahead and try it with curl or make the request from your browser.
Response
In the response, you will see a live quote on mainnet. At the time of writing this article, I can get 1596.87 DAI if I sell 1 WETH as seen in the price parameter.
Here are the results pretty-fied:
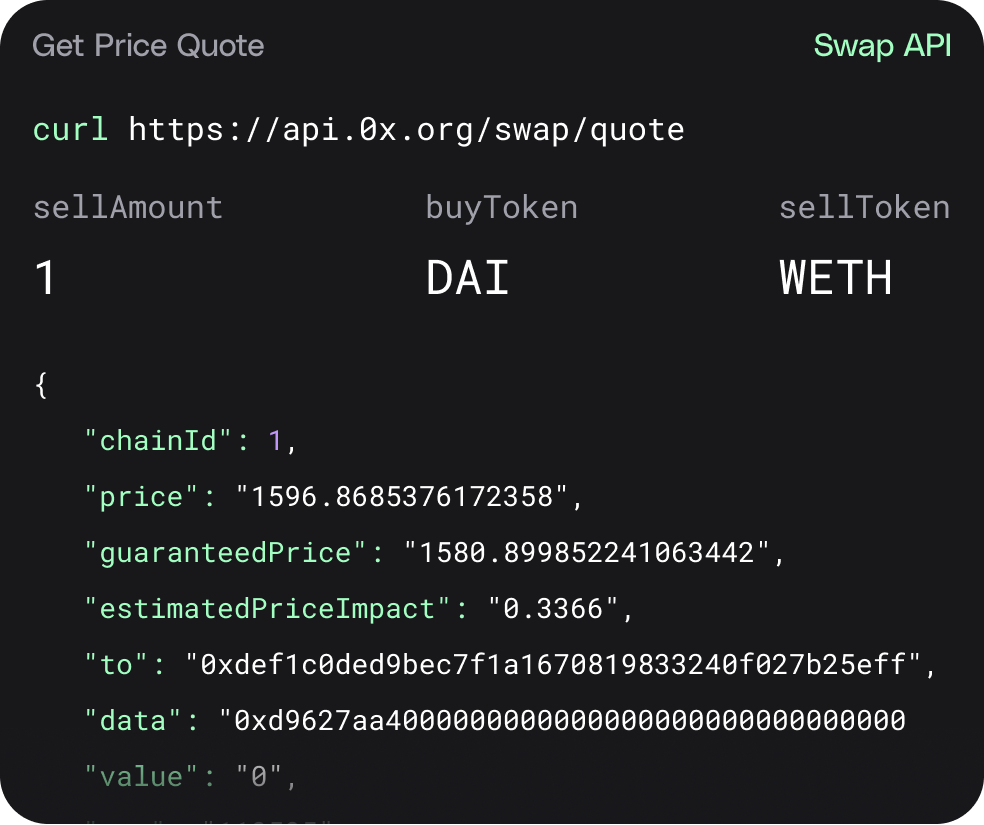
Some notable things to call out:
- The response returned is an unsigned transaction which includes everything, such as the gas price and call data, needed to directly send the transaction to the network. Because of this, you can directly send the raw transaction object to web3.js’s sendTransaction() function.
- Notice all the sources that Swap API is querying. It finds the best price, 100% through Sushiswap.
- Note: If you are using ethers.js, you will need to pull out and submit only the required parameters. See more details here.
- Note: In a production implementation, you’ll want to add some error handling for the API response.
Swap tokens with Swap API in 3 simple steps
Now that we know how to query Swap API and how it responds, let’s look at how to programmatically call it and execute a trade.
If you are creating an application on mainnet, you will need to create a 0x account and get a live API key. Learn more about how to set up a 0x account here.
Once you have an API key, it is as simple as these 3 steps:
- (If needed) Set token allowance
- Fetch a swap quote
- Sign a transaction with your favorite Web3 library
Here are the 3 steps shown in a simple code snippet (you can find the code here):
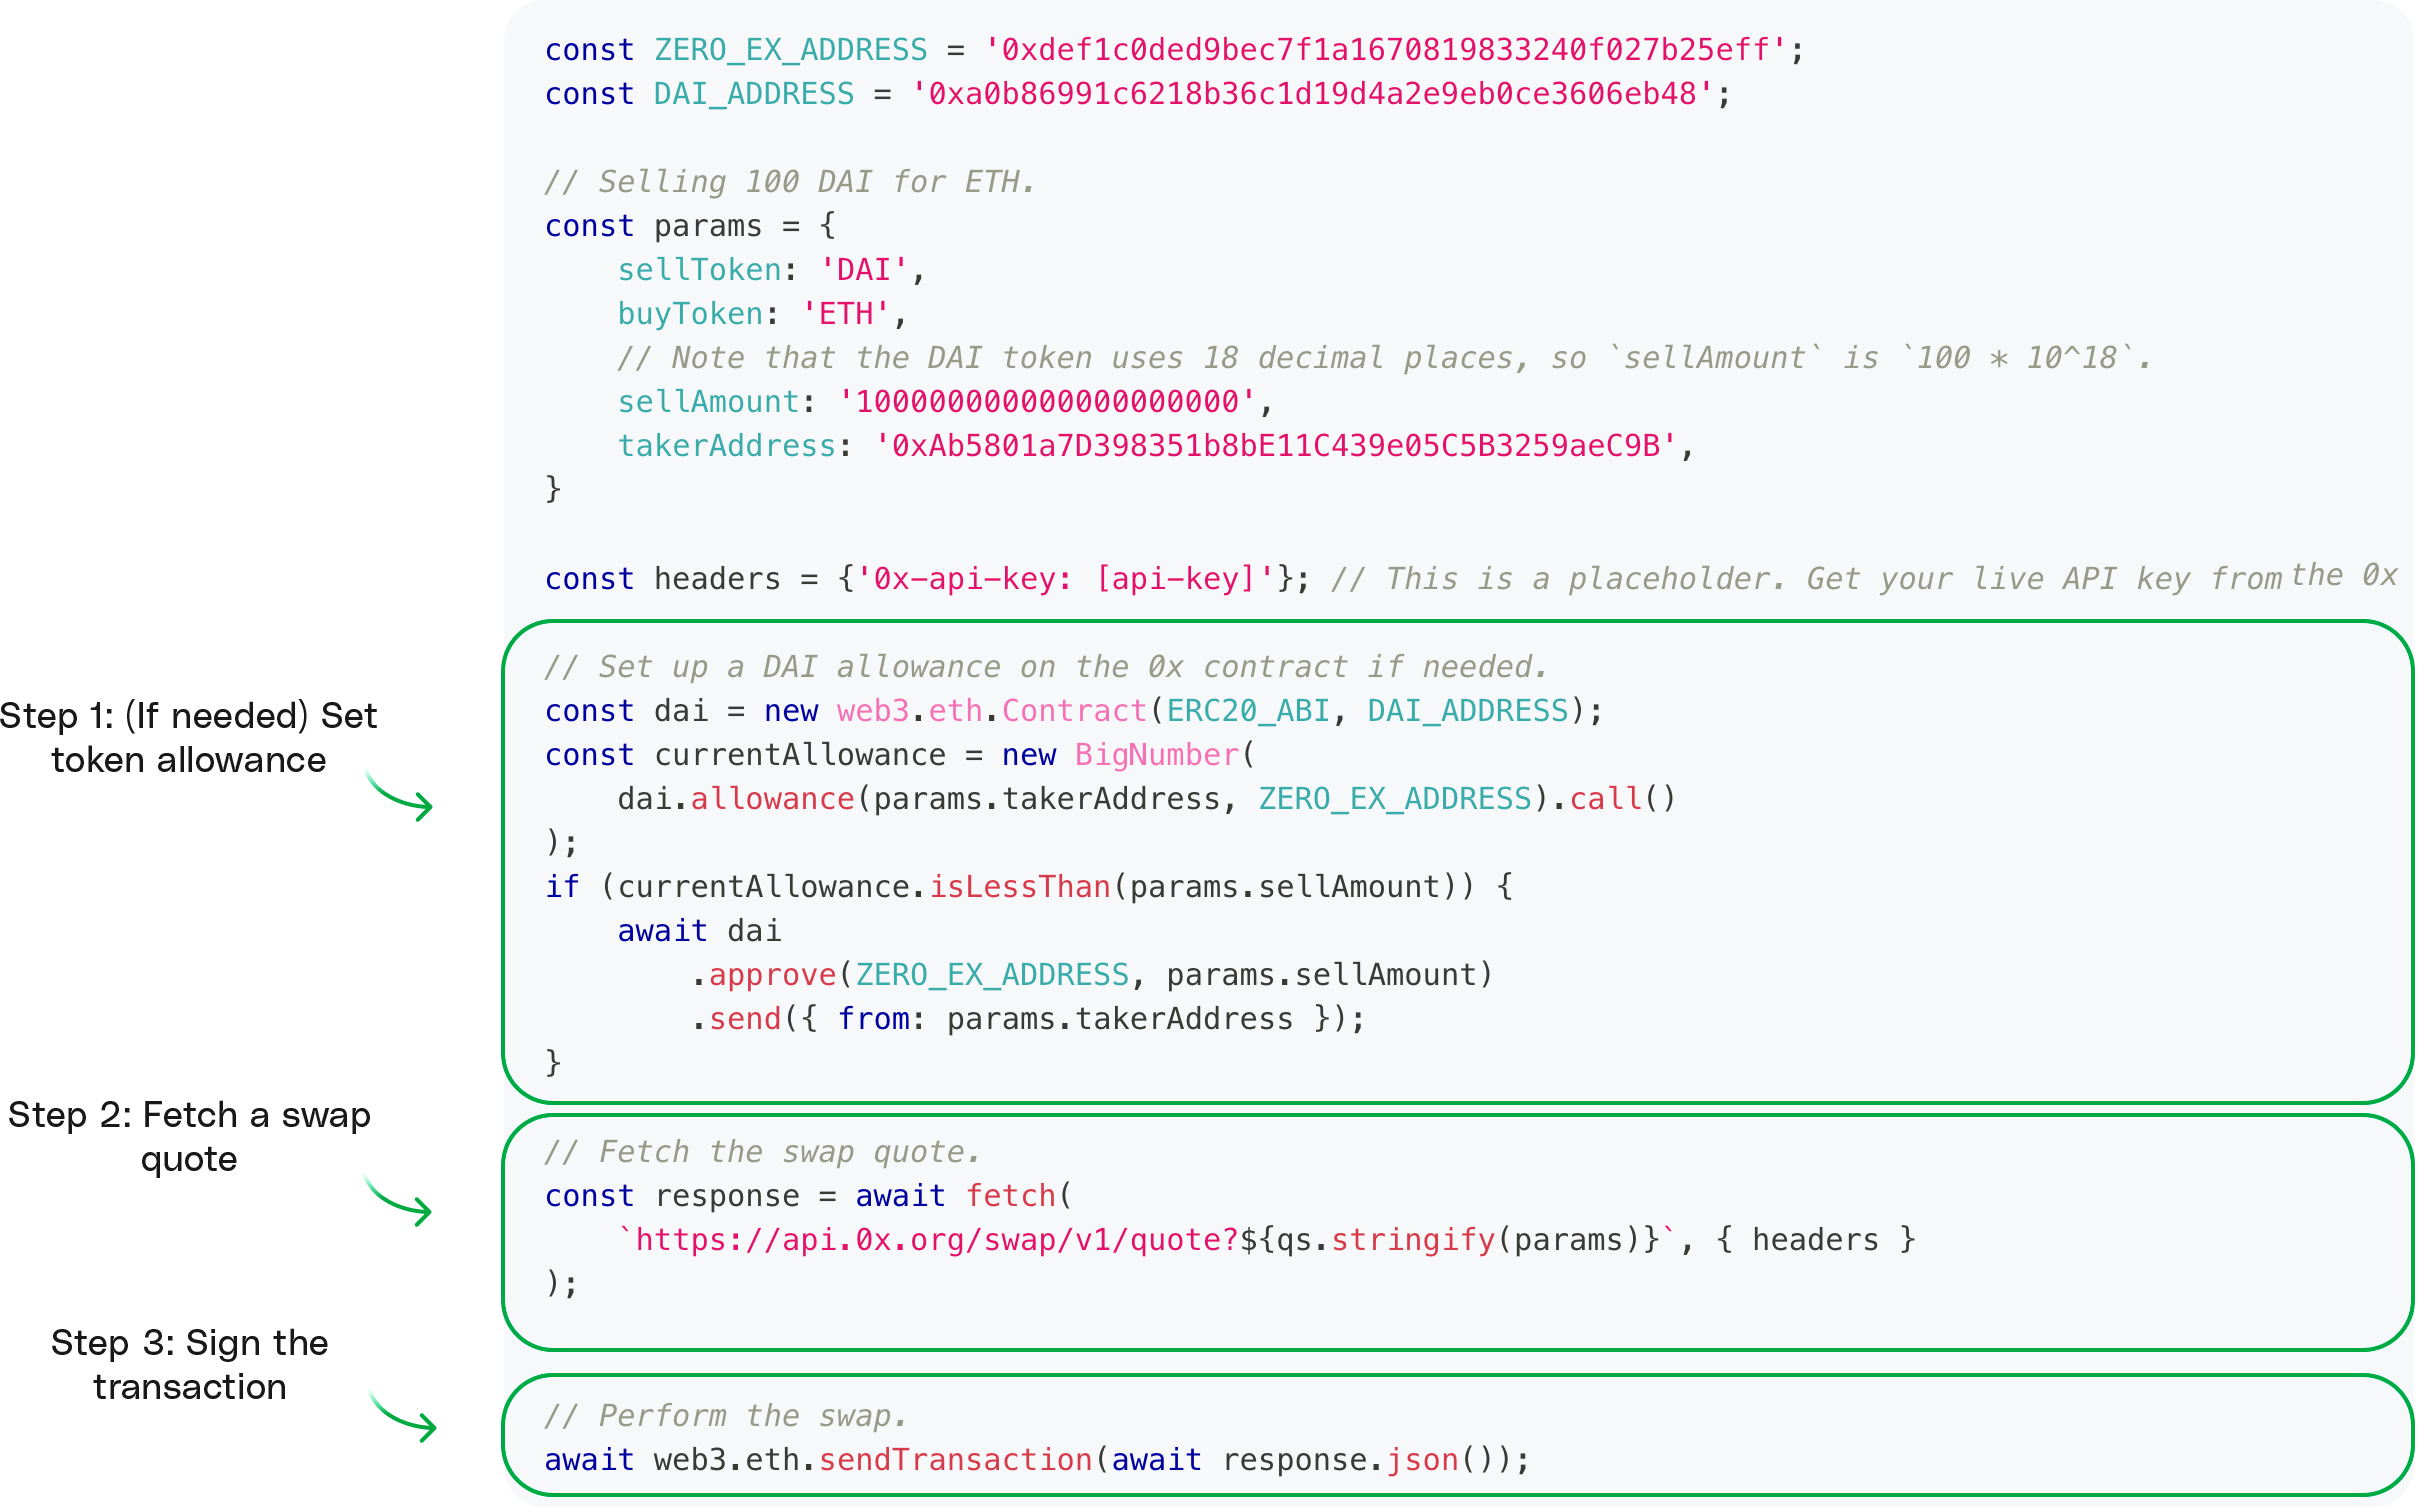
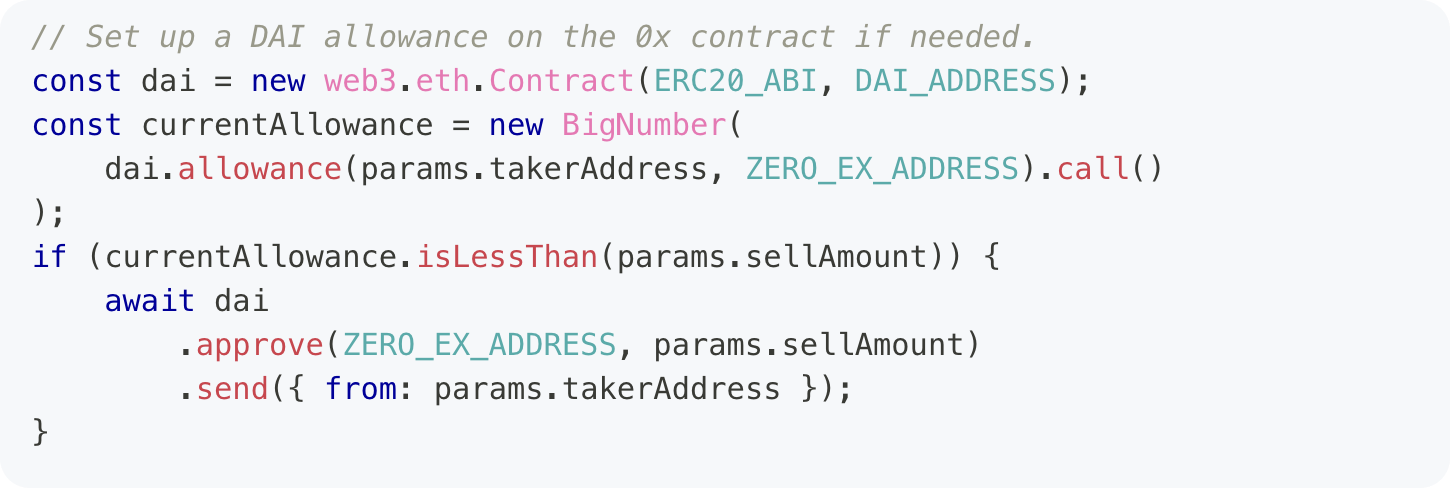
Step 1: Set a token allowance
A token allowance is required if you want a third-party to move funds on your behalf. In short, you are allowing them to move your tokens.
In our case, we would like 0x Protocol’s Exchange Proxy smart contract to trade our ERC20 tokens for us, so we will need to approve an allowance (a certain amount) for this contract to move a certain amount of our ERC20 tokens on our behalf.
In the code snippet below, we allow the 0x smart contract to interact with the DAI from the user’s wallet address.
If you need help setting a token allowance, check out the guide on “How to Set Your Token Allowance”.
Step 2: Fetch a swap quote
Once the token allowance has been set, we can fetch the swap quote using the Swap API request that we looked into earlier.

Step 3: Sign the transaction with your favorite Web3 library
Once we receive a quote, we can sign it with our favorite Web3 library (e.g. web3.js or ethers.js) to send the transaction to the network.
Recall that the response returned by the quote is an unsigned transaction which includes everything, such as the gas price and call data, needed to directly send the transaction to the network.
In this example, we are using web3.eth.sendTransaction(), so we can directly pass in the response.
Note: If you are using ethers.js, you will need to pull out and submit only the required parameters. See more details here.
Note: In a production implementation, you’ll want to add some error handling for the API response.

And that’s it! In 3 simple steps, you’ve retrieved a live swap quote from the 0x Swap API and executed the trade.
If you would like to learn how to plug Swap API into a full token swapping app with UI/UX, check out “How to Build a Token Swap Dapp With Swap API”.
Price and Sources
Before we wrap up, we mentioned above that Swap API has 3 endpoints - quote, price, sources. Let’s take a quick look at the other two.
GET /swap/v1/price
swap/v1/price is nearly identical to /swap/v1/quote, but with a few key differences.
/price does not return a transaction that can be submitted on-chain, it simply provides us the same information. Think of it as the "read-only" version of /quote.
This is important because /quote returns back an order in which a Market Maker has committed their assets to. So, if we ping /quote too much when what we really are just asking for is a price then this can clog up the system!
This endpoint is great if you just want to query prices and don’t need to get transaction data back. As a developer, you may choose to use this endpoint when users are just checking for a price rather than have confirmed they want to trade their tokens.
Here is an example of a GET HTTP /price request. The call is almost identical to /quote:
https://api.0x.org/swap/v1/price?buyToken=DAI&sellToken=WETH&sellAmount=100000000000000000
You can learn more about /price here.
GET /swap/v1/sources
Lastly, there’s also the /sources endpoint, which returns a list of all the available liquidity sources on a specified chain. This may be useful if you would like to display all the liquidity sources available for a trade to your end-user or to help you as a developer understand where liquidity is coming from.
For example, use this request to get a list of liquidity sources on Fantom:
https://fantom.api.0x.org/swap/v1/sources
Wrapping up
In this guide, we looked at how Swap API programmatically sources the best token price and returns the data in a way that is easy for DeFi developers to incorporate into their apps. To learn more about building on 0x, check out the Swap API docs and our full list of 0x guides.
Next, check out our end-to-end tutorial below on how to build a token swap app with Swap API. In this tutorial, you’ll learn how to build a user-facing app that allows users to connect their wallets and trade ERC20 tokens via the API.
.png)
Contents
Subscribe to newsletter