How to build a dApp with Gasless API (Next.js)
Learn how to use Gasless API to build gasless approvals and swaps into your dApp.
Overview
In this guide, we walk-through the Gasless API demo app (live demo | code) built with Next.js and 0x Gasless API. It covers best practices when implementing gasless approvals and swap functionality into your dApp or workflow.
The principles covered are are the same ones used by production-level dApps, such as in the Matcha Auto feature of Matcha.xyz, in which Matcha submits the transactions and handles the gas on users behalf.
This demo showcases trading USDC (a gasless approved token that is on the Polygon-supported sell list) for WMATIC (a non-gasless approved token), (see here for diagram). An expanded version of this app that handles more token support is coming soon.
Checkout the live demo 👉 here
Enabling Gasless in your app allows you to:
- build more intuitive user interfaces and user flows in your applications
- improve your conversion funnel drop-offs due to insufficient gas, and
- set yourself up to easily onboard the next wave of users into Web3.
Video tutorial version here:
Pre-requisites
To create an account, and get your live API keys, visit the 0x Dashboard.
Before diving into this walk-through, it's essential to ensure you are familiar with the following tools and concepts:
- React
- Next.js 13, App Router
- Viem
- Wagmi
- An understanding of how Gasless API works. If not, read:
Currently, Gasless API is supported on Mainnet, Polygon and Arbitrum. This demo is built on Polygon to provide a cost-effective environment for experimentation. You can always modify this app to support Mainnet by adjusting the chain id header for each endpoint.
Here is the github repo, feel free to use it to get started quickly for your own project: https://github.com/0xProject/0x-examples/tree/main/tx-relay-next-app
This is a demo, and is not ready for production use. The code has not been audited and does not account for all error handling. Use at your own risk.
How does it work?
As covered in Understanding Gasless API, this API returns liquidity—prices and quotes—to end users. If a user is happy with a quote the API has provided, they can sign an EIP-712 message for the approval and trade (the approval object enables gasless approvals and the trade object enables gasless swaps). Then, Gasless API can submit the transaction to the blockchain on behalf of the user, eliminating the need for the end user to pay for gas manually.
This demo app covers the flow outlined in the Gasless Approval + Gasless API Flow.
This demo app showcases trading USDC (a gasless approved token that is on the Polygon-supported sell list) for WMATIC (a non-gasless approved token), specifically this flow:
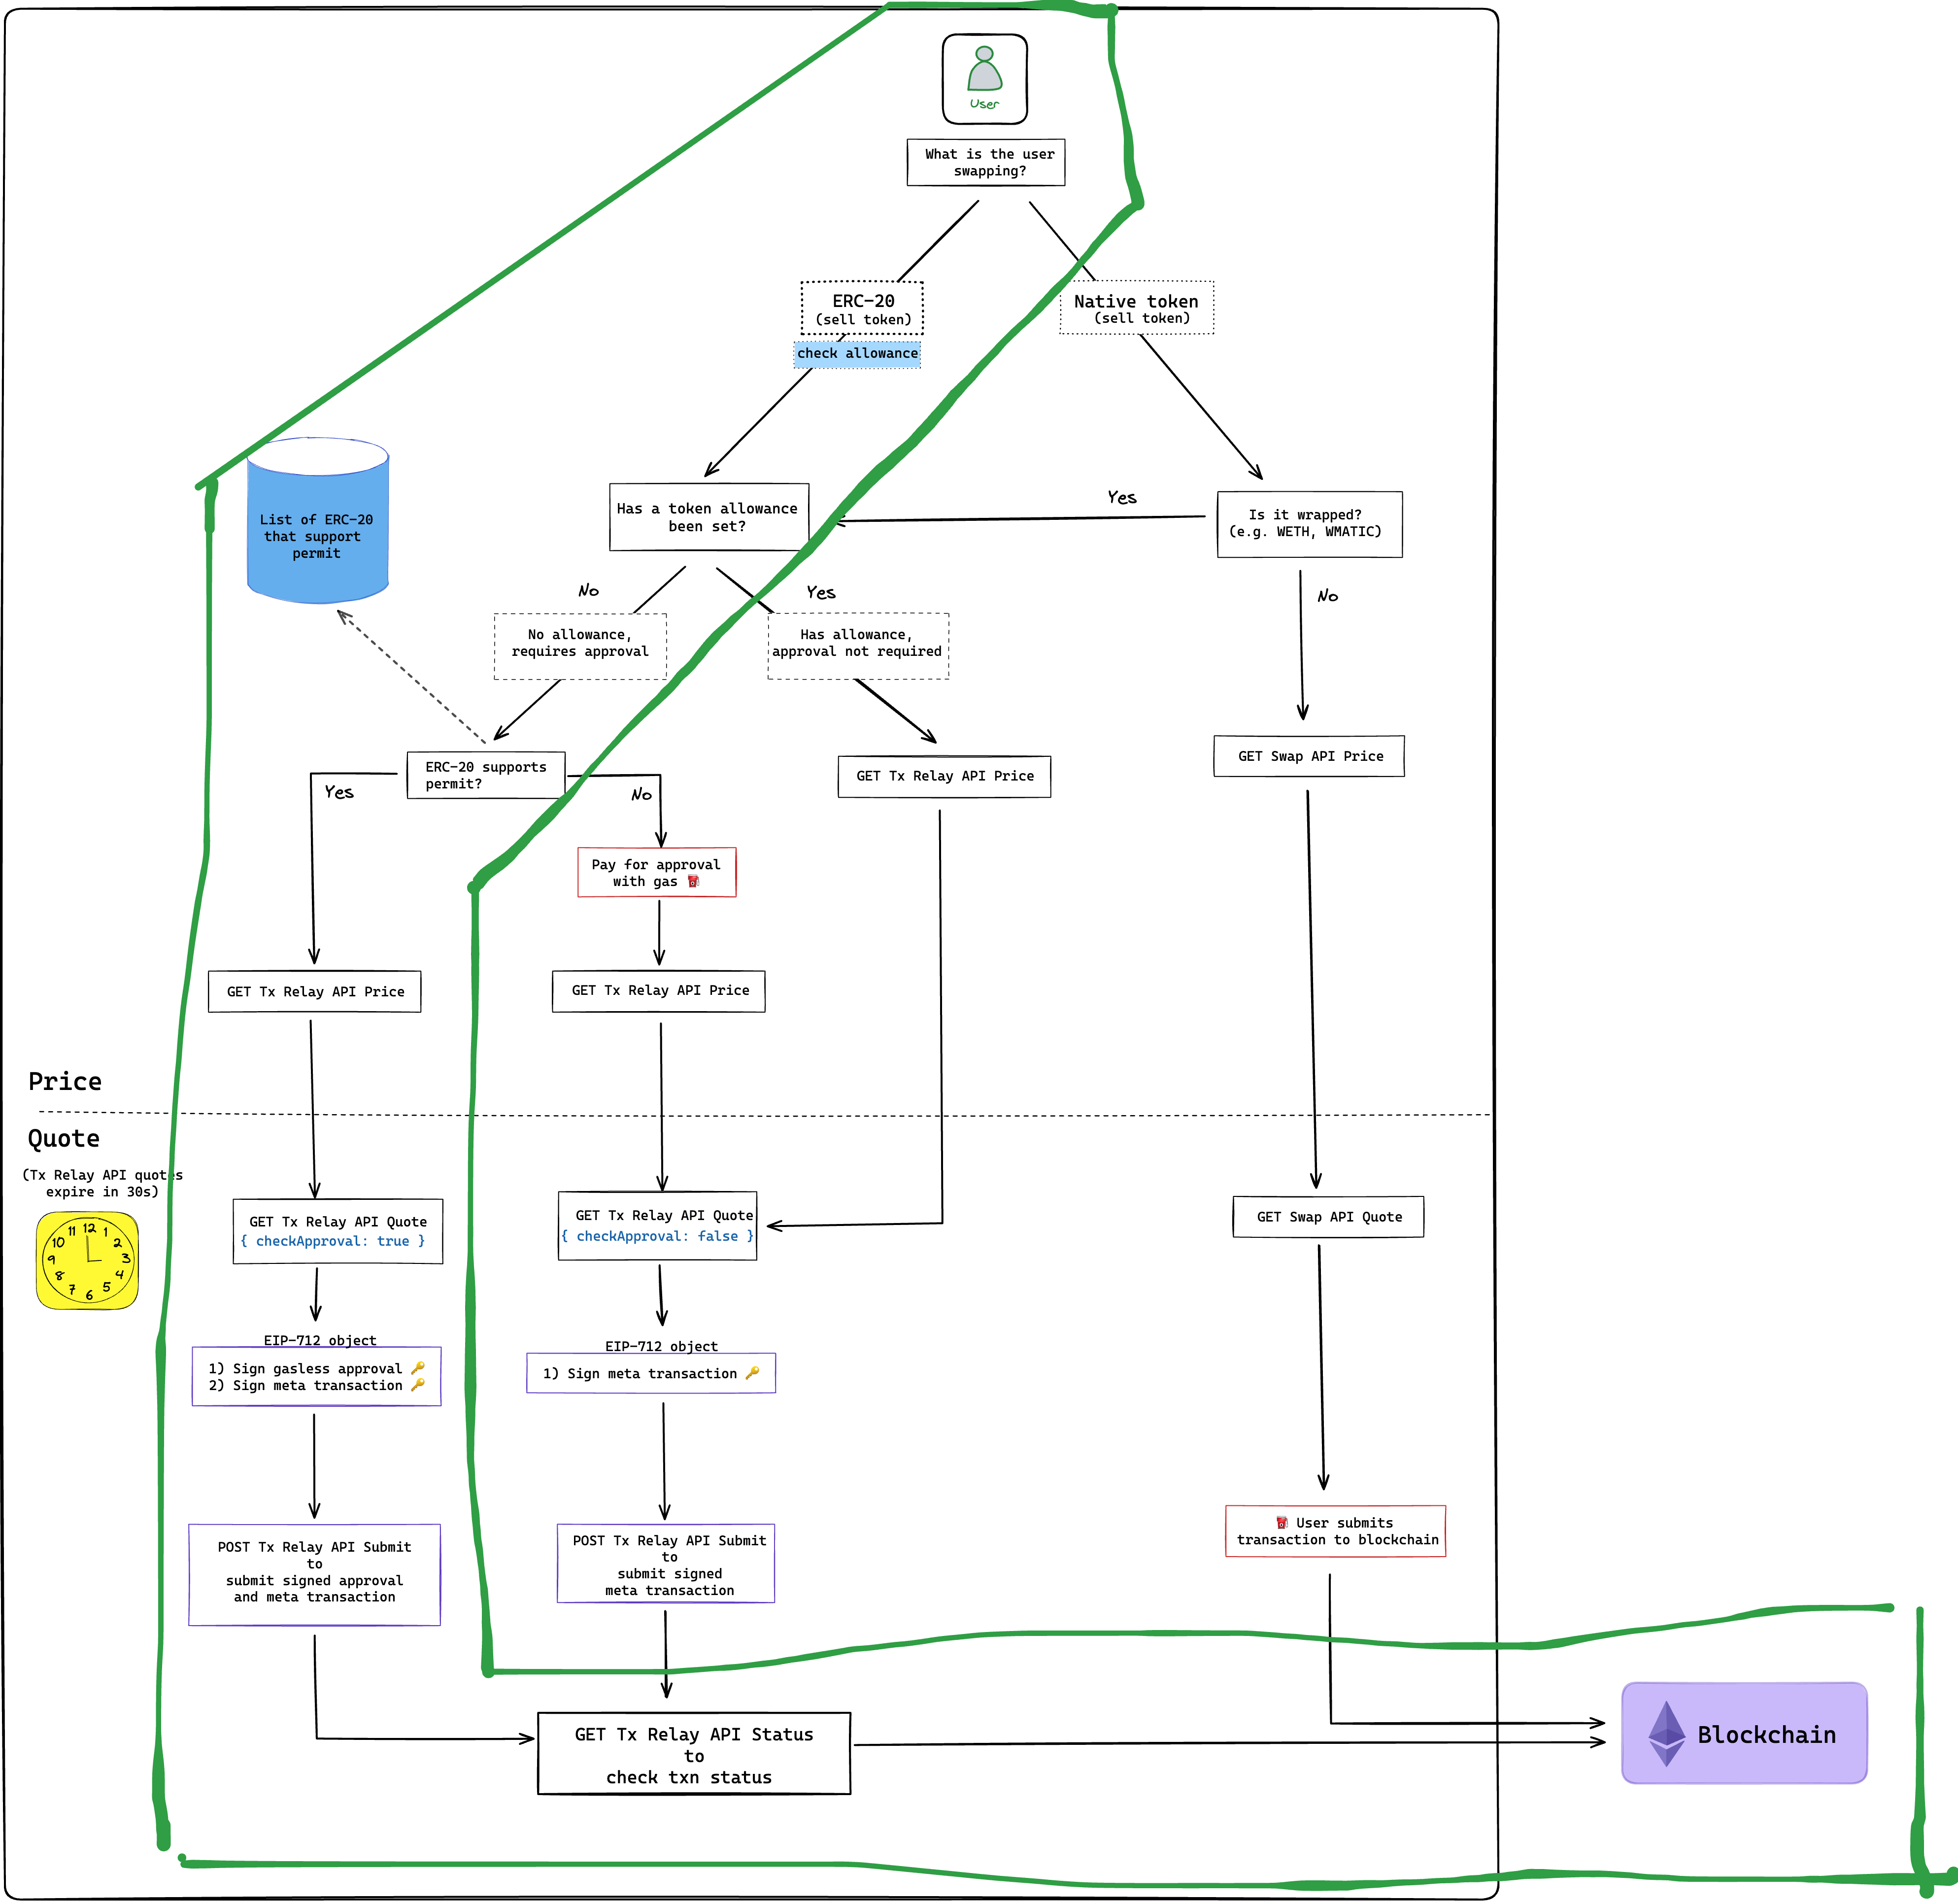 .
.
Note, Gasless API is composable with Swap API if you want to offer execution optionality (for example native tokens which is not supported by Gasless API). You can design a UX where advanced users can opt in and opt out of gasless without sacrificing experience. Check out Composing Gasless Approval + Gasless API + Swap API Flow if you would include this functionality.
Project structure
This demo app is setup using Next.js 13 App Router. Here is an explanation of the structure of the app and key files.
tx-relay-next-app
├── app
│   ├── layout.tsx
│   ├── page.tsx
│   ├── providers.tsx
│   │
│   ├── api
│   │   ├── price
│   │   │   └── route.ts
│   │   ├── quote
│   │   │   └── route.ts
│   │   ├── status
│   │   │   └── route.ts
│   │   └── submit
│   │       └── route.ts
│   │
│   └── components
│         ├── price.tsx
│         ├── quote.tsx
│         └── status.tsx
│
└─── src
     ├── supports-permit
     │   └── 137.json
     └── utils
         ├── eip712_utils.types.ts
         ├── schema.ts
         ├── signature.ts
         └── constants.ts
/app/- The root directory that contains global structure of the application that contains shared layouts and additional configuration/app/layout.tsx/- Contains the global layout components that wrap all our pages/app/page.tsx/- Contains all the components (PageView, QuoteView, StatusView) for our app and the logic for when each should show in the UI/app/providers.tsx/- Sets up global context providers such as RainbowKitProvider and WagmiConfig/api/- Contains the API routes (/price, /quote, /submit, /status)/components/- Contains the the components that are used as the UI in our app(PageView, QuoteView, StatusView)/src/- Contains non-component or non-API routes files. Contains token lists (e.g. tokens that support gasless approvals/Permit) and utility files
Core concepts overview
Gasless API offers four different endpoints. It's important to understand how these endpoints are leverage by the UI/UX components and how they are related concepts such as the user's wallet and token lists.
Here we cover a summary of core concepts and when each API endpoint is used in this app:
- A React library that makes it easy to add wallet connection to your dApp
- (1) Gasless approvals token list - Gasless approvals are available for ERC-20 token that supports Permit (EIP-2612). You can find a list of these tokens in the gasless approvals list or you can also use
/tx-relay/v1/swap/quoteto check ifisGaslessAvailable = true - (2) Supported sell tokens - On Mainnet, Gasless API supports only selling ERC-20 tokens that are on Uniswap’s token list. On Polygon and Arbitrum, all Swap API supported tokens are supported.
- (1) Gasless approvals token list - Gasless approvals are available for ERC-20 token that supports Permit (EIP-2612). You can find a list of these tokens in the gasless approvals list or you can also use
- Component for users to browse for a price without committing to a trade (i.e. get indicative price)
- Check if token allowance as been set
- Check if token supports Permit -> if yes, gasless approval; otherwise, pay for approval
- Fetch indicative with GET
/tx-relay/v1/swap/price- Wrap API call behind
/app/api/price/route.ts
- Wrap API call behind
- Component for users to review final quote and submit trade
- Fetch firm quote with GET
/tx-relay/v1/swap/quote- Wrap API call behind
/app/api/quote/route.ts
- Wrap API call behind
- Sign gasless approval (if needed) and sign trade objects
- Submit the trade via POST
/tx-relay/v1/swap/submit- Wrap API call behind
/app/api/submit/route.ts
- Wrap API call behind
- Component to check the status of the trade
- Uses GET
/tx-relay/v1/swap/status/:trade-hashif the submitted trade was successful- Wrap API call behind
/app/api/status/route.ts
- Wrap API call behind
Core concepts deep-dive
🌈 RainbowKit
What is it?
RainbowKit is a React library that makes it easy to add wallet connection to your dapp. We are using their Next.js App Router example in our app.
Check out their installation instructions to understand the configurations. You can configure your desired chains and generate the required connectors.
Code
Setup WalletConnect projectId in providers.tsx
RainbowKit relies on WalletConnect. Obtain a free projectId from WalletConnect Cloud and replace the key here.
// Inside /tx-relay-next-app/.env.template
# To get a RainbowKit relies on WalletConnect, get a free projectId here:
# https://cloud.walletconnect.com/app
NEXT_PUBLIC_WALLET_CONNECT_PROJECT_ID=
// Inside /app/providers/tsx
const projectId = process.env.NEXT_PUBLIC_WALLET_CONNECT_PROJECT_ID as string; // Replace with your own free key from WalletConnect Cloud https://cloud.walletconnect.com/sign-in
🪙 Token lists
What is it?
Gasless API offers gasless approvals and gasless swaps, but for a subset of tokens. It's important to understand which tokens are applicable and how to check for support availability.
Gasless approvals tokens list - You can find a list of tokens that work with gasless approvals in the gasless approvals token list. Generally, these are tokens that support EIP-2612. You can also examine a token’s eligibility at trade time, by observing the response from requests to
/tx-relay/v1/swap/quote. If the variableisGaslessAvailable = true, the token the user is selling supports gasless approvals.Supported sell tokens list - On Mainnet, Gasless API supports only selling ERC-20 tokens that are on Uniswap’s token list. On Polygon and Arbitrum, all Swap API supported tokens are supported.
This demo how to utilize these two lists for a specific use case on the Polygon Network (137) - trading USDC (gasless approved token that is on the Polygon-supported sell list) for WMATIC (a non-gasless approved token)
Code
Verify sellToken against gasless approved token list
To check if the sellToken supports gasless approvals, we setup a .json file of all the tokens that support permit on Polygon in the /supports-permit/137.json file.
// Inside /src/supports-permit/137.json, setup database of tokens that support Permit using token address as the key
{
  "0x2791bca1f2de4661ed88a30c99a7a9449aa84174": {
    "kind": "permit",
    "domain": {
      "name": "USD Coin (PoS)",
      "version": "1",
      "chainId": 137,
      "verifyingContract": "0x2791bca1f2de4661ed88a30c99a7a9449aa84174",
      "salt": "0x0000000000000000000000000000000000000000000000000000000000000089"
    },
    "domainSeparator": "0x294369e003769a2d4d625e8a9ebebffa09ff70dd7c708497d8b56d2c2d199a19"
  },
  "0x7ceb23fd6bc0add59e62ac25578270cff1b9f619": {
    "kind": "executeMetaTransaction::approve",
    "domain": {
      "name": "Wrapped Ether",
      "version": "1",
      "chainId": 137,
      "verifyingContract": "0x7ceb23fd6bc0add59e62ac25578270cff1b9f619",
      "salt": "0x0000000000000000000000000000000000000000000000000000000000000089"
    },
    "domainSeparator": "0x2739d6640de1503427ab7c5bd20094483387d4f8de3af1aeb1cfbf826f1b5b30"
  },
...
We check sellToken against this list to see if it is eligible for gasless approvals.
// Inside /app/components/price.tsx, check if the sellToken supports Permit
import MATIC_PERMIT_TOKENS from "../../src/supports-permit/137.json";
...
const isSellTokenPermit = Boolean(maticPermitTokensDataTyped[sellToken]);
🏷 PriceView
What is it?
This component is for users to browse for a price without committing to a trade, aka, get the indicative price. The code for the component lives in /app/components/price.tsx. The logic for when this component appears in the UI is in /app/page.tsx, it is displayed if the user has not clicked "Review Trade" and finalizes the price.
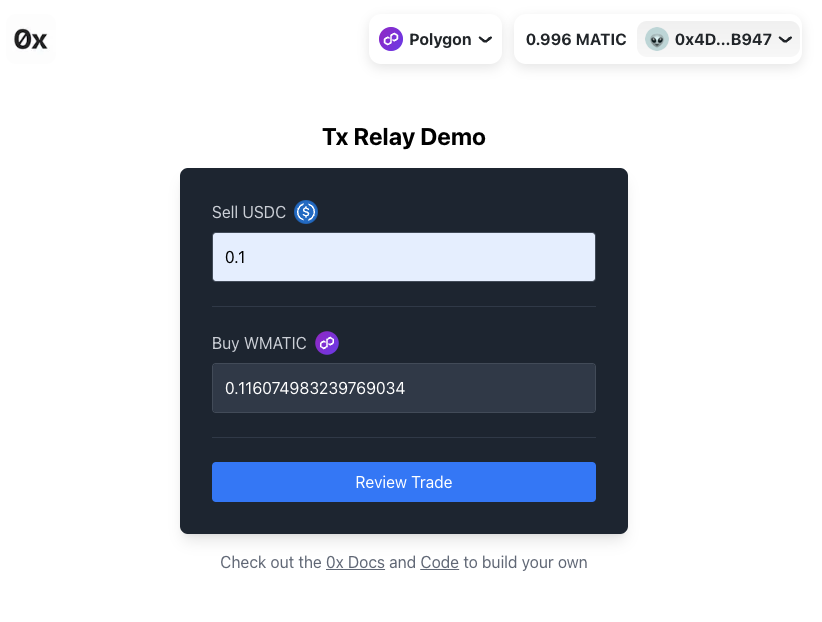
UI/UX Walk-through
- User selects sell and buy tokens from the token selectors
- Users inputs a sellAmount
- Users can “Connect Wallet” powered by Rainbowkit
- Whenever sellAmount changes, the app fetches a price even if a wallet is not connect
- Displays returned buyAmount
- When users find a price they like, they can connect their wallet, and switch to the correct network (e.g. Polygon), the button now says “Review Trade” if the user has enough of the sell token; otherwise, it reads “Insufficient Balance”
- Allowance checks
- Checks if the user has a sufficient allowance for the selected token
- Checks if the sellToken supports Permit -> if yes, gasless approval; otherwise, pay for approval via standard token approval route
- Sets
checkApprovaldepending if user has sufficient allowance and if sellToken supports Permit
- When user clicks “Review Trade”, they are take to the QuoteView component
Code
Fetch price with GET /tx-relay/v1/swap/price
Fetch /tx-relay/v1/swap/price is wrapped behind app/api/price/route.ts and triggered in the UI by useEffect here in /app/components/price.tsx.
Wrapping our API key protects it because all API requests are viewable by if someone inspects the browser, but we don’t want them inspecting an finding our keys. Instead, when the user queries for an indicative price, it pings our API setup in app/api/price/route.ts and that pings the 0x's Gasless API using the API key in the header.
In addition, we use Next.js App Router's built-in data fetching pattern and the useEffect hook to make the request. By using useEffect, we will get a stream of data updates constantly and automatically, and the UI will quickly respond to any changes, such as when the user inputs a new sellAmount.
Display formatted sellAmount and buyAmount
parseUnits- Parses a string representing ether, such as the string 1.1 into a BigNumber in wei. This is useful to convert a user inputted value into a BigNumber that is usable for API requests.formatUnits- Formats a BigNumberish into a string, which is useful when displaying a balance or displaying a BigNumerish value returned from an API response as a string in the UI.
// Inside /app/components/price.tsx
const parsedSellAmount =
  sellAmount && tradeDirection === "sell"
    ? parseUnits(sellAmount, sellTokenDecimals).toString()
    : undefined;

const parsedBuyAmount =
  buyAmount && tradeDirection === "buy"
    ? parseUnits(buyAmount, buyTokenDecimals).toString()
    : undefined;
// Inside /app/components/price.tsx
setBuyAmount(formatUnits(data.buyAmount, 18));
Set checkApproval
When making /tx-relay/v1/swap/quote request, we can pass the checkApproval flag. This is a boolean that indicates whether or not to check for approval so that we could potentially use the gasless approval feature. The value checkApproval is determined by whether or not the user has already set a token allowance (if set, is the allowance sufficient) and if the token supports permit.
const checkApproval = isSellTokenPermit && !hasSufficientAllowance;
Below is a diagram to help understand different cases (i.e. if the sellToken supports Permit, if the sellToken has set an allowance already).

In our demo app, we cover Cases 1 & 2:
- Case 1 (USC → WMATIC) - in this case, the sellToken, USDC, supports Permit, and no allowance has been set; therefore,
checkApprovalis set totruebecause we need both approval object (for gasless approvals) and the trade object (for gasless swaps). - Case 2 (USC → WMATIC) - in this case, the sellToken, USDC, supports Permit, and the allowance is enough to cover the trade; therefore,
checkApprovalis set tofalsebecause we do not need a gasless approval object to sign, only trade object (for gasless swaps).
Currently the demo app does not cover cases 3 and 4, but here is an overview if you would like to include them:
Case 3 (WMATIC → USDC) - in this case, the sellToken, WMATIC, does not support Permit, and the allowance is enough to cover the trade; therefore,
checkApprovalis set tofalsebecause we do not need a gasless approval object to sign, only trade object (for gasless swaps).Case 4 (WMATIC → USDC) - in this case, the sellToken, WMATIC, does not support Permit, and no allowance has been set. In this case, the token allowance needs to be set via the standard route because gasless approvals are not supported. Once it has been set, this case will look like Case 3 (no Permit, max allowance); therefore,
checkApprovalis set tofalsebecause we do not need a gasless approval object to sign, only trade object (for gasless swaps).
Note that only one flow sets checkApproval:true, this is when the token supports permit and no allowance has been set, this is the only time when we need a gasless approval.
💸 QuoteView
What is it?
This component fetches a firm quote for users to review and submit trade. The logic for when this component appears in the UI is in /app/page.tsx, it is displayed after the user has clicked "Review Trade".
In this component, the use can sign the gasless approval (if applicable), sign the gasless swap, and submit the order.
Although gasless approvals and gasless swap are bundled in the same transaction when returned by /quote, they each require a signature for the corresponding EIP-712 object, approval.eip712 and trade.eip712 respectively. This demo app separates signing these two objects for clarity; however, you may elect to create a front-end experience wherein it appears to the user that they are signing only one transaction.
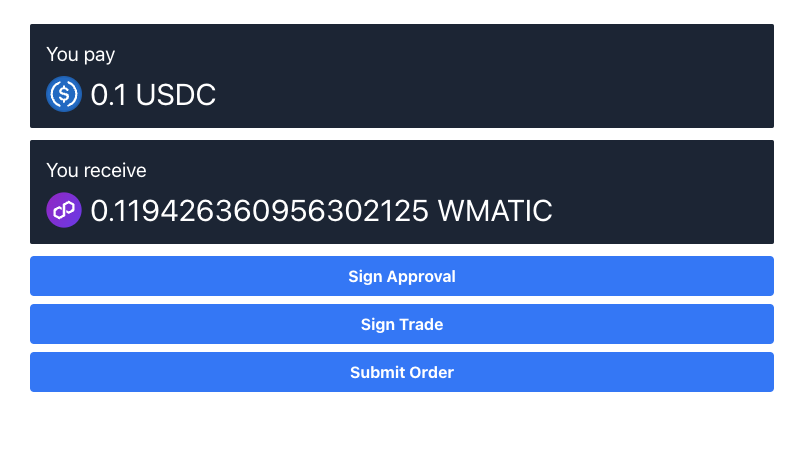
UI/UX Walk-through
- Display the sell and buy Amounts that the user pays and receives
- If the user likes the quote, they can:
- “Sign Approval” -
approval.eip712is the “approval” object which contains the necessary information to process a gasless approval. It is requested viacheckApproval(set in PriceView). You will only be able to initiate a gasless approval for the sell token if the response has bothisRequiredandisGaslessAvailableset totrue. - “Sign Trade” -
trade.eip712is the “trade” object which contains the necessary information to process a trade. - “Submit Order” - When all returned objects are signed, use can submit the trade
- “Sign Approval” -
- ⏰ Be aware the quote is time sensitive, valid for ~30s. Recommend adding timer that refreshes the quote to ensure it stays fresh.
Code
Fetch quote with GET /tx-relay/v1/swap/quote with checkApproval
The /tx-relay/v1/swap/quote fetch is wrapped behind /app/api/quote/route.ts, triggered in the UI by the useEffect hook here in /app/components/quote.tsx, similar to what we did for PriceView.
The value of checkApproval is passed from PriceView. Recall that this is a boolean that indicates whether or not to check for approval and potentially return the approval object.
Sign objects & split signatures
To take advantage of gases approvals, user must sign approval.eip712 and the trade.eip712 objects returned by /quote. These objects contain everything you need needed to sign these objects (domain, types, primaryType, message). We use wagmi's useSignTypedData hook to sign the objects. The returned signature is an Ethereum signature hex string.
Code to sign approval object
// Inside /app/components/quote.tsx
const { isSuccess, signTypedDataAsync } = useSignTypedData({
  domain: approvalEip712.domain,
  message: approvalEip712.message,
  primaryType: approvalEip712.primaryType,
  types: approvalEip712.types,
});
Code to sign trade object
// Inside /app/components/quote.tsx
const { isSuccess, signTypedDataAsync } = useSignTypedData({
  domain: tradeEip712.domain,
  message: tradeEip712.message,
  primaryType: tradeEip712.primaryType,
  types: tradeEip712.types,
});
Once signed, the signature needs to be split to its individual components (v, r, s) and to be formatted in an object that can be POST to /submit (see object format here).
For splitting signatures, we use a variation of this splitSignature implementation. Our implementation is set up in /src/utils/signature.ts.
Code to split signature for approval
// Inside /app/components/quote.tsx
// if approval exists, split signature for approval and then format data to submit
if (gaslessApprovalSignature) {
const approvalSplitSig = splitSignature(gaslessApprovalSignature);
console.log(approvalSplitSig, "<-approvalSplitSig");

approvalDataToSubmit = {
type: approvalType,
eip712: approvalEip712,
signature: {
...approvalSplitSig,
v: Number(approvalSplitSig.v),
signatureType: SignatureType.EIP712,
},
Code to split signature for trade
// Inside /app/components/quote.tsx
// split signature for trade and then format data to submit
if (tradeSignature) {
const tradeSplitSig = splitSignature(tradeSignature);
console.log(tradeSplitSig, "<-tradeSplitSig");

tradeDataToSubmit = {
type: tradeType,
eip712: tradeEip712,
signature: {
...tradeSplitSig,
v: Number(tradeSplitSig.v),
signatureType: SignatureType.EIP712,
},
Submit order with POST /tx-relay/v1/swap/submit
Once the signed, split, and formatted approval and trade data objects are set up, we POST them to /tx-relay/v1/swap/submit which is wrapped behind /app/api/submit/route.ts. This code is called from the "Submit Order" button in the UI (code).
If the submssion is successful, /submit responds with the order type and the tradeHash. Learn more about submit responses:
{
  "type": "metatransaction_v2",
  "tradeHash": "0xde5a11983edd012047dd3107532f007a73ae488bfb354f35b8a40580e2a775a1"
}
/submit return whether or not the order was successful or if there is an error. The demo app has general error handling, for production-level apps, it's recommended to include more robust error handling depdning on the returned status code (code).
✅ StatusView
What is it?
This component checks and displays the status of the trade to the user. The logic for when this component appears in the UI is in /app/page.tsx, it is displayed if tradeHash has been set in QuoteView.
UI/UX Walk-through
- Display the trade status
- “Transaction Pending ⏳” if transaction submission has not confirmed, or
- “Transaction Completed! 🎉” if transaction successfully mined
Code
Check trade status with GET /tx-relay/v1/swap/status/:trade-hash
Use GET /tx-relay/v1/swap/status/:trade-hash to check if the submitted trade was successful.
In /page, we add a third component, StatusView, that displays if the tradeHash has been set in QuoteView. To retrieve this, we setup a callback function onSubmitSuccess={setTradeHash} inside QuoteView that is called when tradeHash has been set.
// Inside /app/page.tsx
 if (tradeHash) {
    return (
      <div className="p-8">
        <StatusView tradeHash={tradeHash} />
      </div>
    );
...
<QuoteView
   checkApproval={checkAppoval}
   price={price}
   quote={quote}
   setQuote={setQuote}
   onSubmitSuccess={setTradeHash} // callback function for when tradeHash has been set
   takerAddress={address}
/>
/status will continously respond with the status of the transaction (e.g. pending, failed, success, submitted, confirmed), so we need to contiously poll the endpoint to check the current status. We do so using setInterval(callback function, delay in ms) and useEffect to continuously ping /status until the status is confirmed (code here).
Reminder: /tx-relay/v1/swap/status/:trade-hash doesn’t take trade-hash as a query param, just concatenate it on as part of the query
Monetization your swap integration
And as your business grows, Swap API offers low-friction ways to monetize your products.
Web3 teams can leverage Swap API to unlock new revenue streams by easily tapping into affiliate fee and trade surplus features. Regardless of whether you’re on a free or paid plan, monetization options are available to all integrators.
0x APIs offers two monetization options out-of-the-box:
- Collect affiliate fees (i.e. trading fee or commission)
- Collect trade surplus (i.e. positive slippage)
For more details about monetizing, check out the How to monetize your app using 0x Swap API guide which discusses pricing considerations and shows code samples for how to easily implement these options.
Try it out
Here is code for the demo app, feel free to use it to get started quickly for your own project: https://github.com/0xProject/0x-examples/tree/main/tx-relay-next-app
Conclusion
Building with Gasless API allows you to efficiently and securly implement gasless swaps and gasless approvals into your dApp and workflow, helping grow your user base with seamless onboarding and increasing retention.
By following the best practices outlined in this guide and demo, you can create a user-friendly and robust dApp that enables trustless token swapping across various networks.
Smooth swapping! 🚫⛽